1.1 SFDC Org Requirements
This guide assumes the customer has an SFDC organization with an Enterprise-level subscription.
1.2 User Licenses
Ensure that the required SFDC user licenses are available for use with the Zoomifier SFDC Connector. Create additional SFDC users if necessary.
1.3 Creating a Programmatic Access User
Create an SFDC user with an Administrative Profile for programmatic access from Zoomifier.
Steps to Create a Programmatic Access User:
- 1. Log in to Salesforce with an administrative account.
- 2. Navigate to Setup > Users > New User.
- 3. Provide the necessary details for the new user, ensuring:
- User License: Salesforce
- Profile: System Administrator (or another profile with sufficient permissions)
- 4. Save the user details.
- 5. Once the user is created, ensure that the credentials (username, password, and security token) are stored securely, as they will be needed during Zoomifier setup.
2.1 Tenant Creation
A tenant represents an organization’s Zoomifier account that integrates with SFDC. Follow these steps to create a tenant:
- 1. Log in to https://app.zoomifier.com
- 2. Navigate to Admin Panel > Tenants.
- 3. Click Create New Tenant.
- 4. Provide the Tenant Name and other required details.
- 5. Click Save.
- 1. Navigate to Admin Panel > Users in Zoomifier.
- 2. Click Add New User.
- 3. Enter the user’s Name, Email Address, and Role.
- 4. Ensure the email matches the SFDC username exactly.
- 5. Click Save.
- 1. Log in to https://app.zoomifier.com
- 2. Click the User Profile icon in the top-right corner.
- 3. Navigate to Settings > Salesforce Settings.
- 4. Enter the following details:
- ● SFDC Admin Username (Email Address)
- ● SFDC Admin Password
- ● Security Token
- 5. If a Security Token is not available:
- Log in to Salesforce.
- Navigate to Settings > My Personal Information > Reset Security Token.
- Click Reset Token. A new security token will be sent via email.
- 6.Ensure that the same admin user exists in Zoomifier with the same email address.
2.2 User Creation in Zoomifier
To ensure seamless integration, create Zoomifier users with email addresses that match their corresponding SFDC usernames.
Steps to Create Users:
Steps to Create Users:
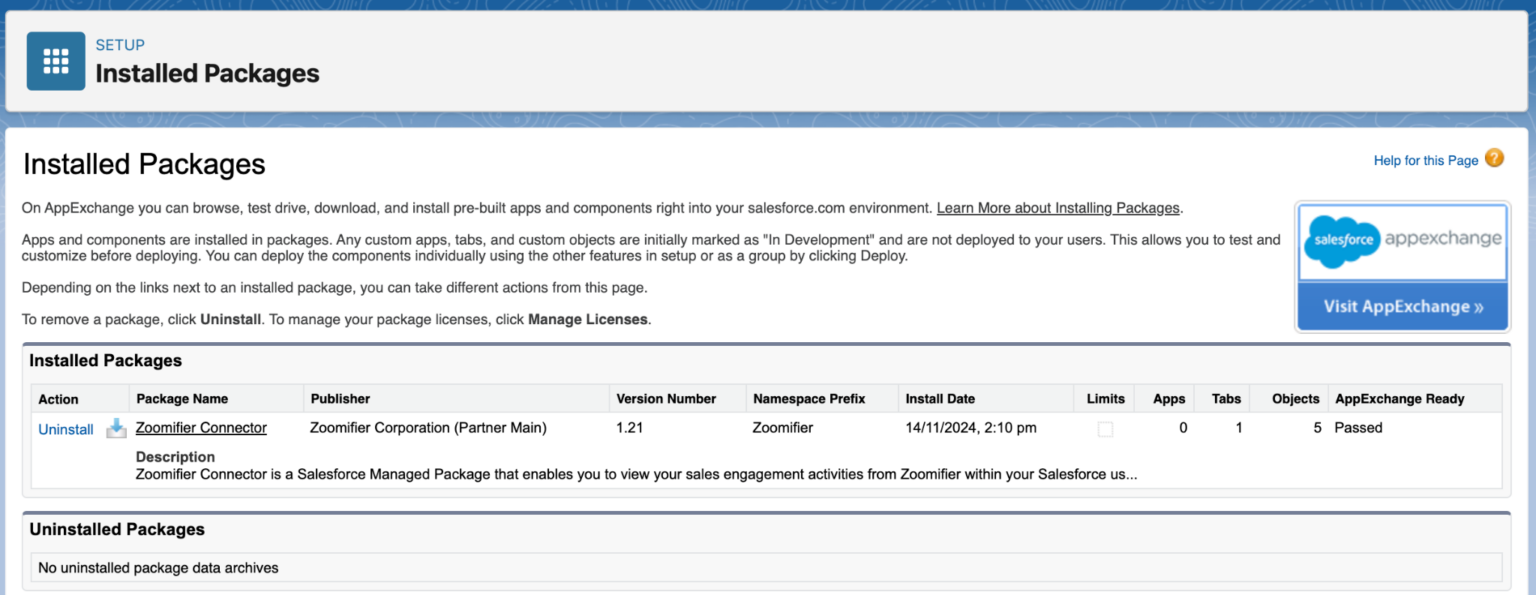
3.1 Installing the Zoomifier SFDC Connector
- 1. Copy and paste the following URL into your browser:
- https://login.salesforce.com/packaging/installPackage.apexp?p0=04t4w000000tQ0z
- 2. Log in using an SFDC Administrative User.
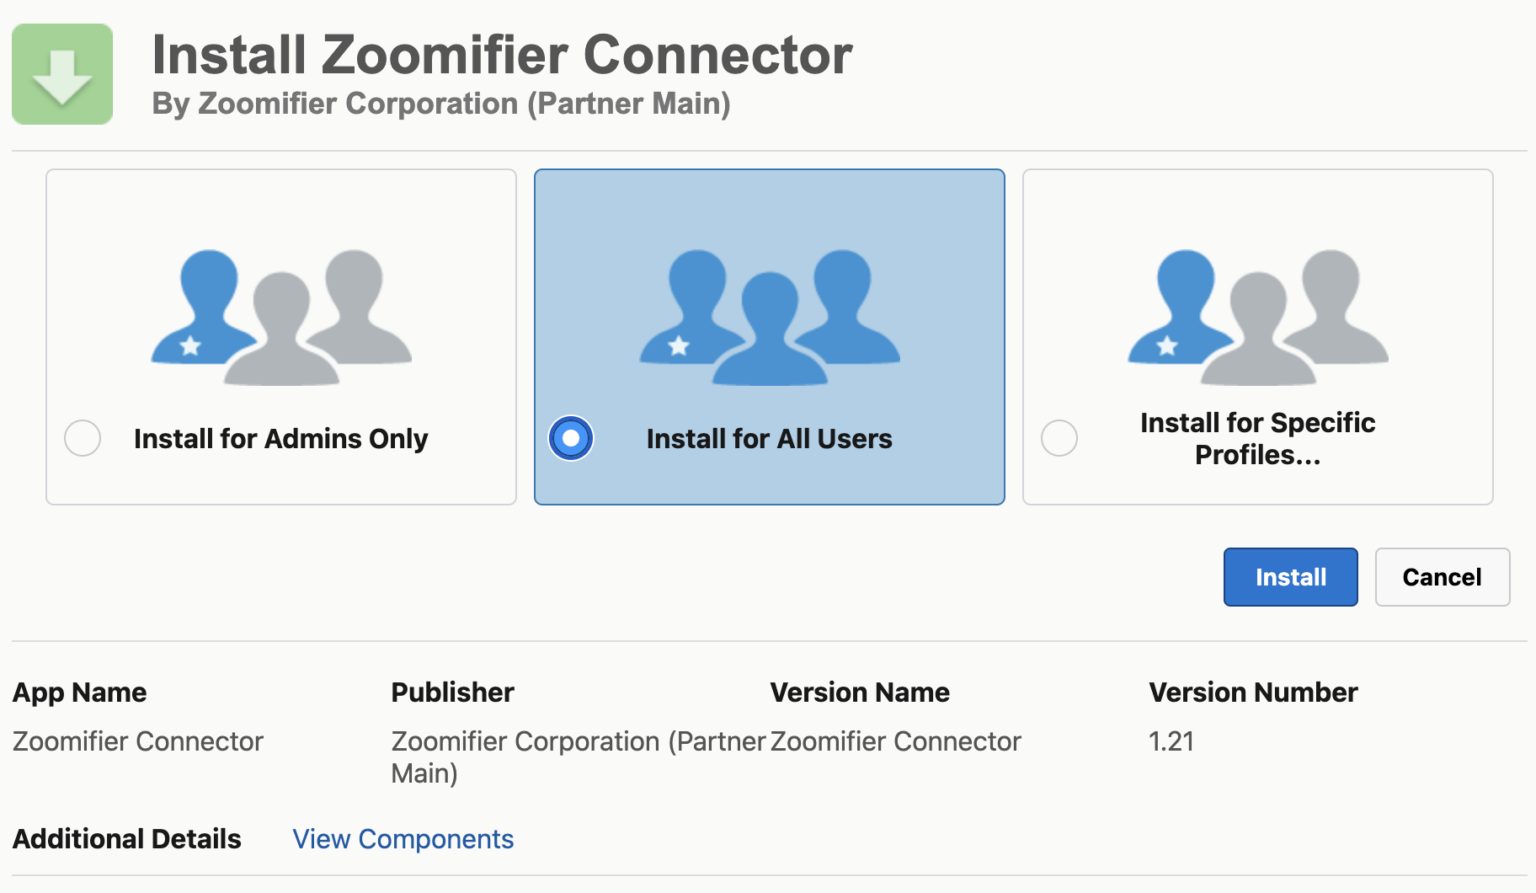
- 3. On the “Install Zoomifier Connector” screen, select Install for all users (recommended for seamless access).
- 4. Click Install.
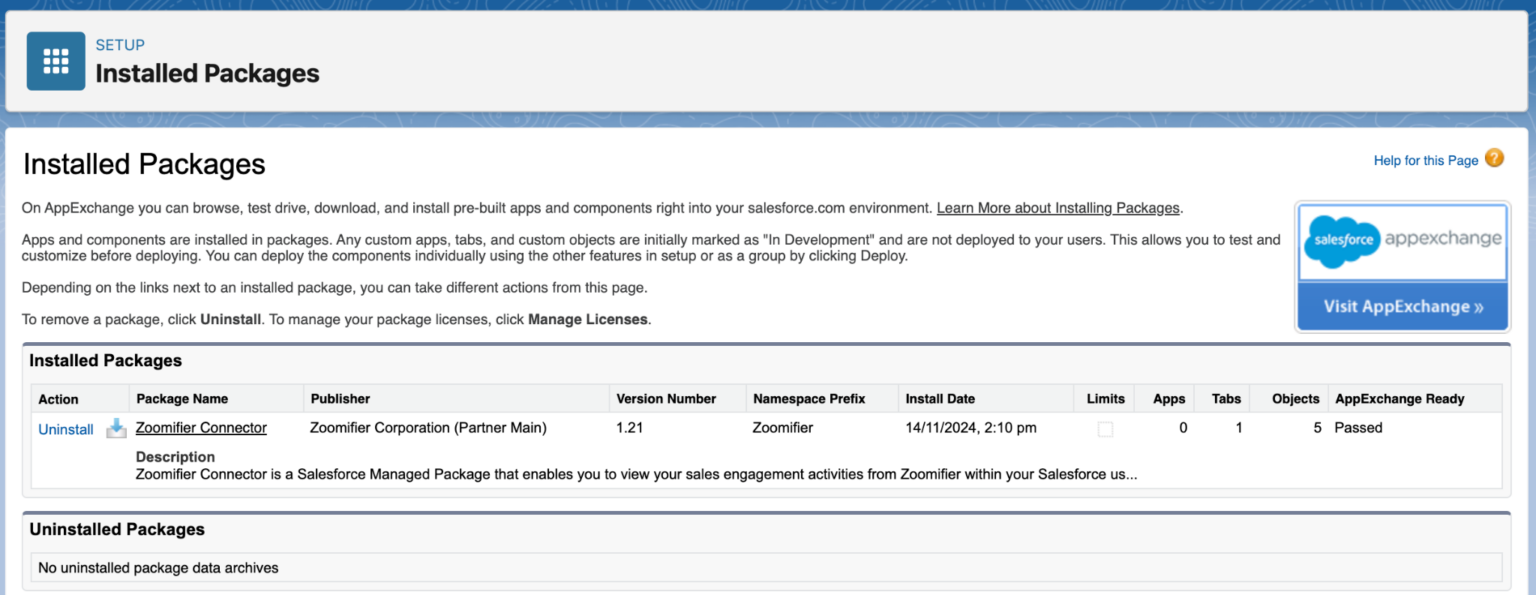
- 5. After installation is complete, click Done.
3.2 SFDC Configuration for Zoomifier Connector
3.2.1 Creating the Zoomifier User Profile
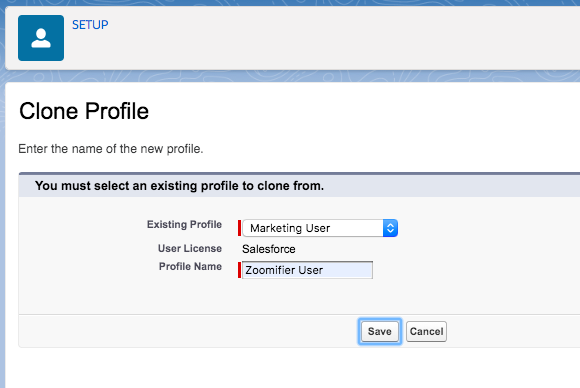
- A. Navigate to Setup > Manage Users > Profiles (Lightning: Administration > Users > Profile).
- B. Click New to create a profile named Zoomifier User (clone from Marketing User).
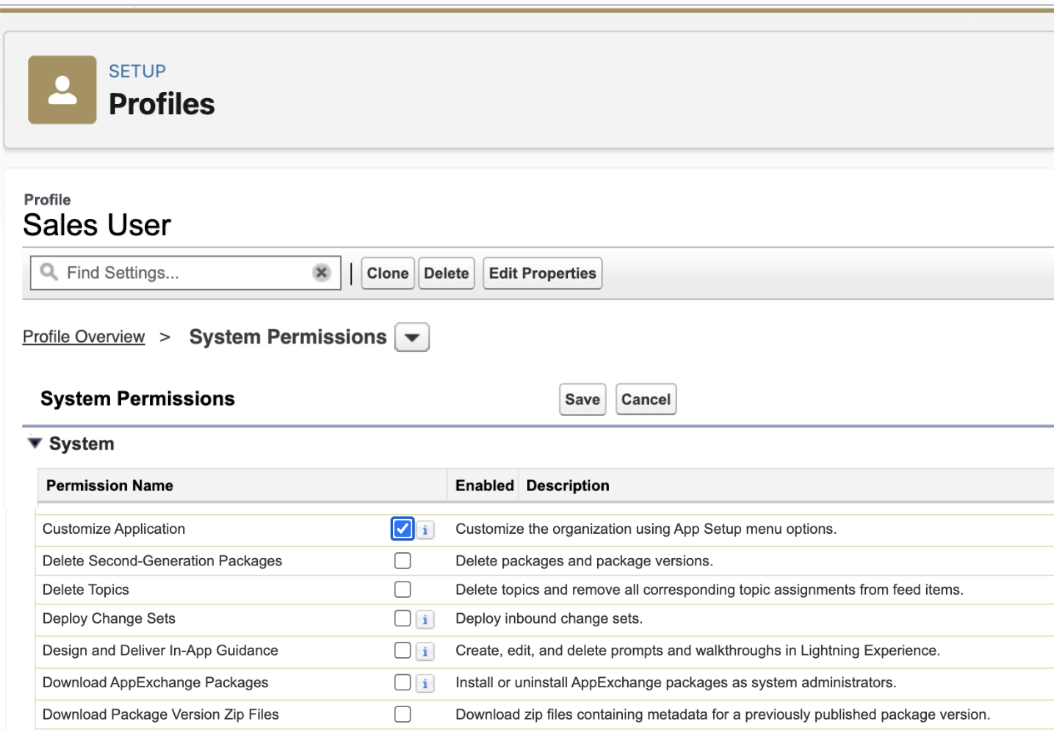
- C. For all relevant user profiles (e.g., System Administrator, Sales User, Zoomifier User), configure:
- a. System Permissions:
- ● Click Edit on the Profile Detail screen.
- ● Locate System Permissions and enable “Customize Application”.
- ● Click Save
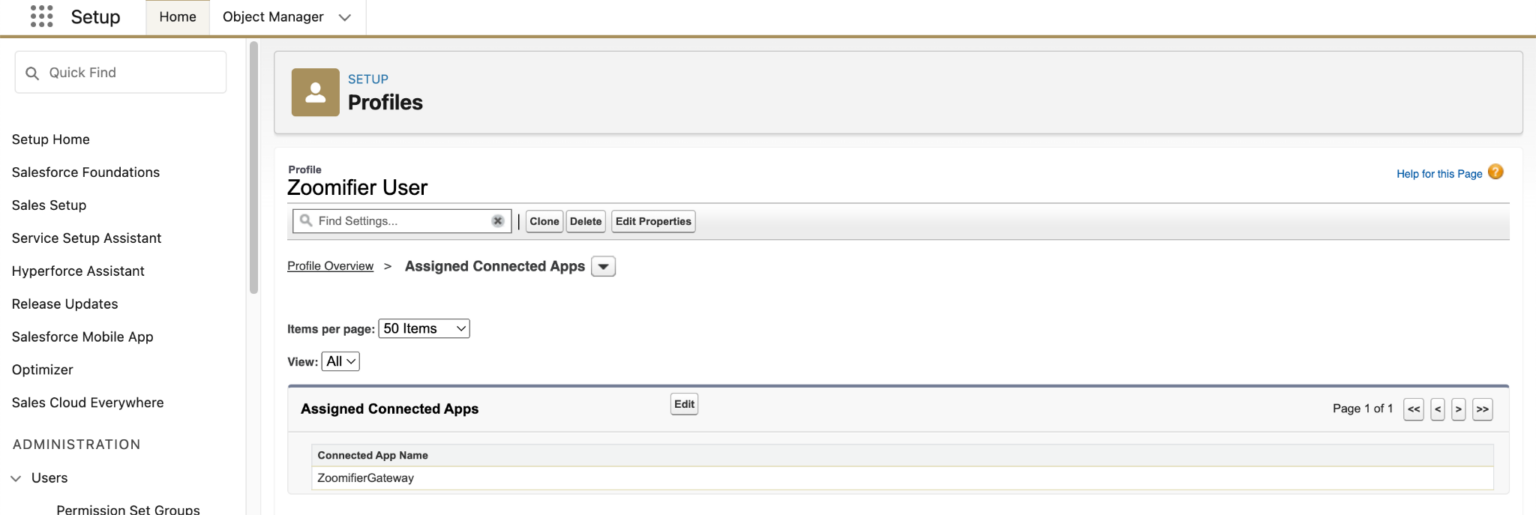
- b. Connected Apps:
- ● Click Assign Connected Apps.
- ● Click Edit under Assign Connected App.
- ● Enable the checkbox for ZoomifierGateway.
- ● Click Save.
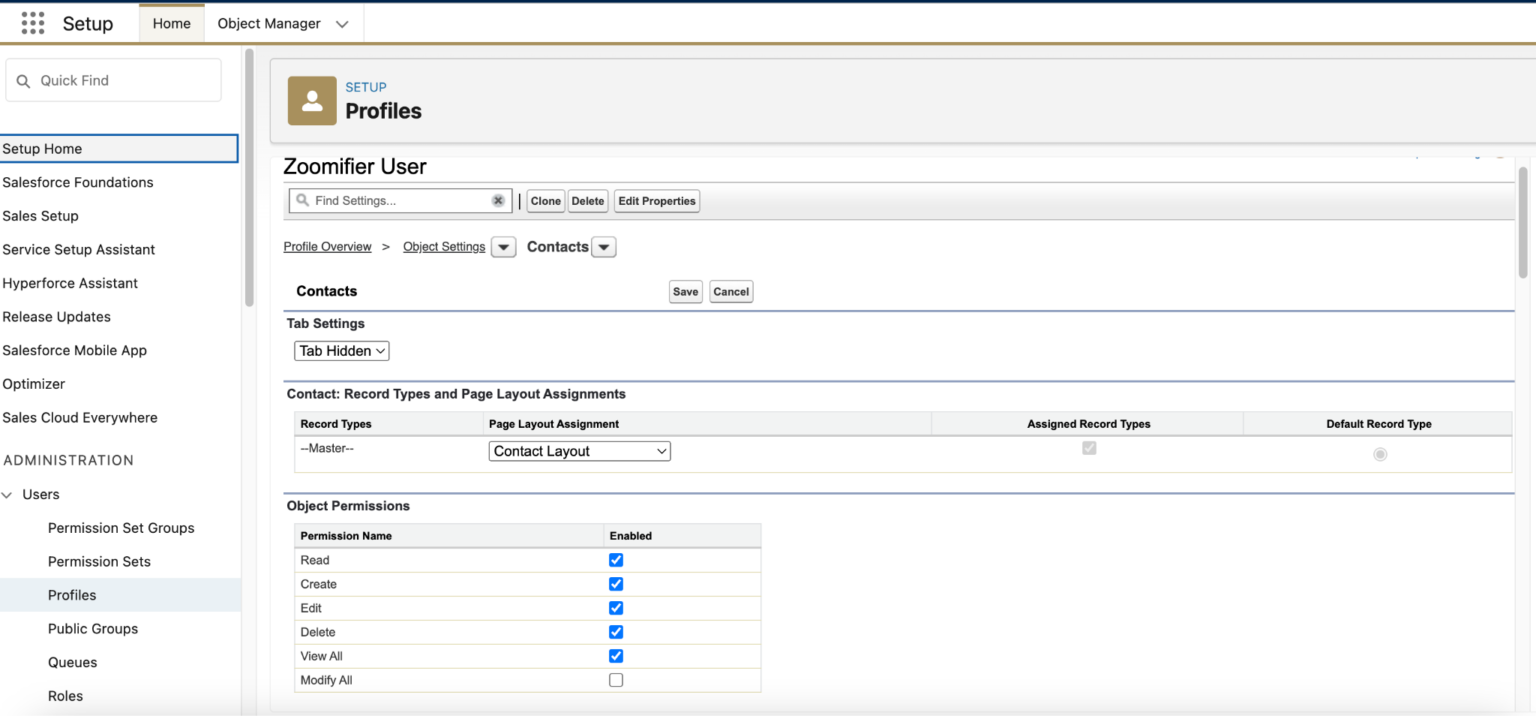
- c. Object Settings:
- ● Click on Contacts and select View All.
- ● Click Save.
- ● Repeat for Leads.
- ● Click on Zoomifier Contents and select Tab Hidden.
- ● Click Save
- ● Repeat for Zoomifier Lead Contents.
- ● Click on Zoomifier Events and select Read and View All.
- ● Click Save.
- ● Repeat for Zoomifier Lead Events.
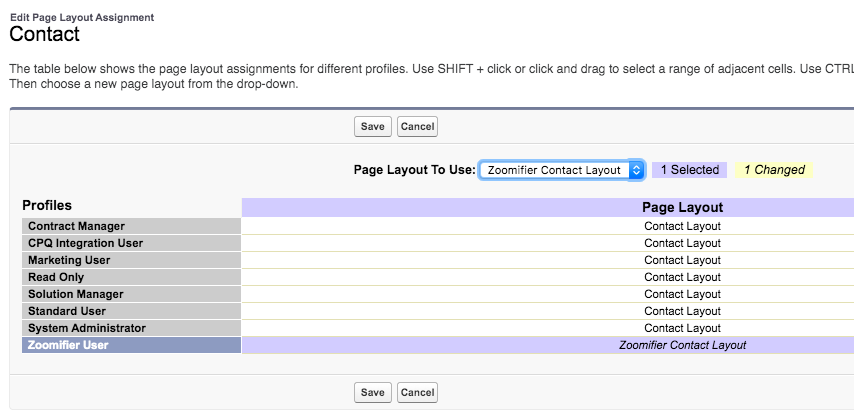
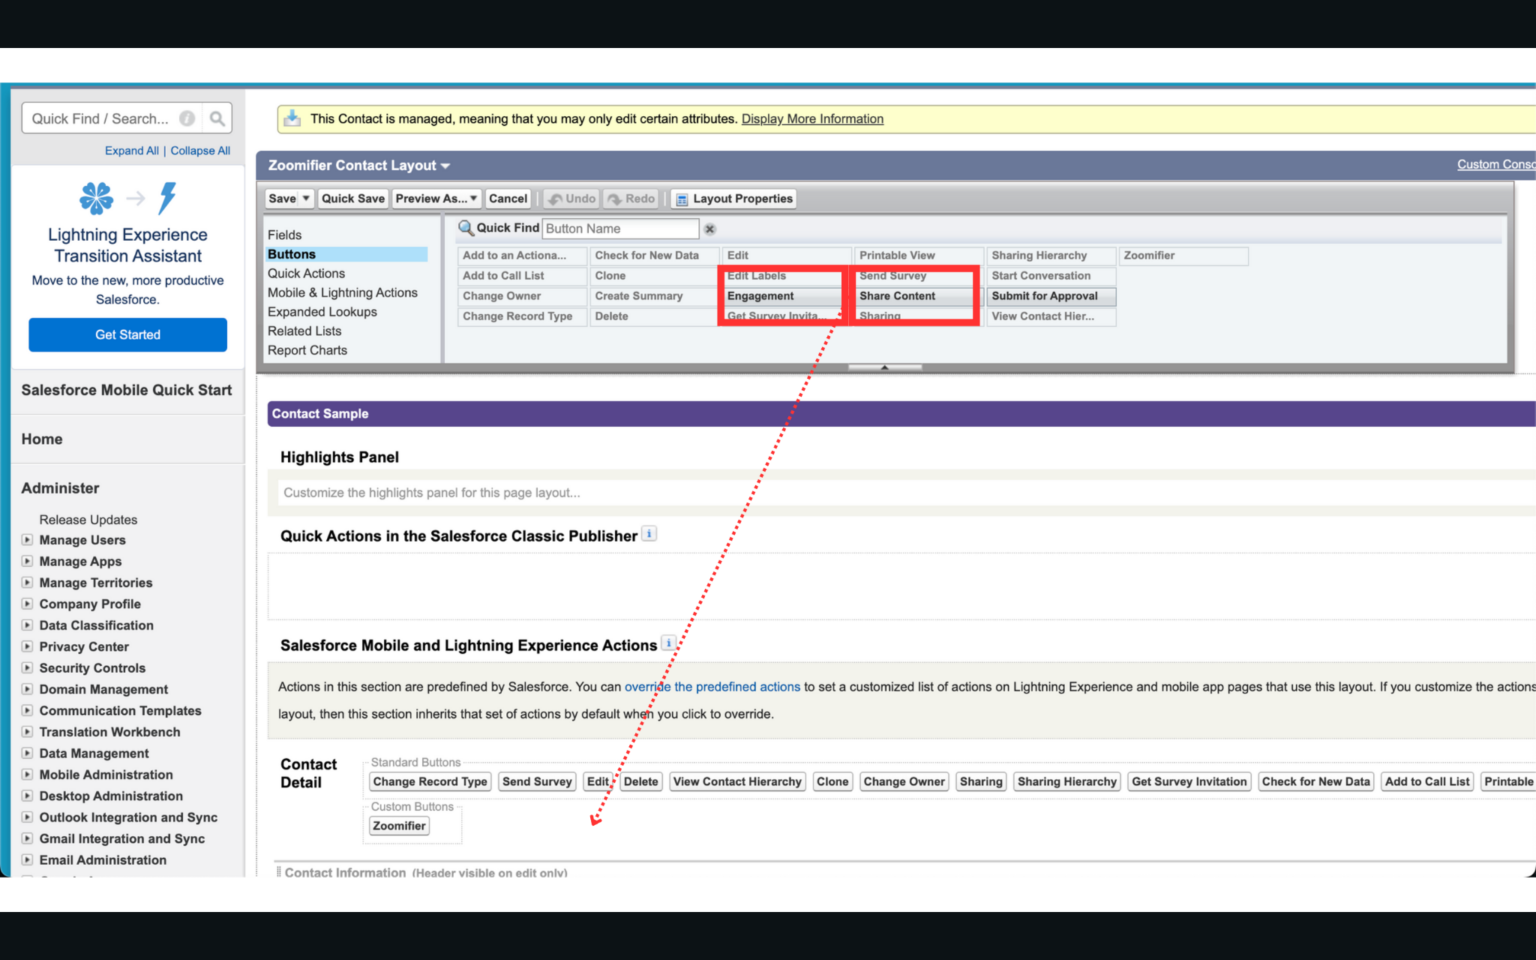
- 1. Navigate to Setup > Customize > Contacts > Page Layouts (Lightning: Object Manager > Contacts > Page Layouts).
- 2. Click Page Layout Assignment > Edit Assignment.
- 3. Select Zoomifier User, then assign Zoomifier Contact Layout.
- 4. Open the Zoomifier Contact Layout and:
- ● Drag & drop Share Content and Engagement buttons inside “Contact Details”.
- ● Click Save
- 5. Repeat the above steps for Leads.
- ● Navigate to Setup > Customize > Leads > Customize fields on Leads Page. (For Lightning View, go to Object Manager > Lead > Page Layouts).
- ● Click Edit on the Zoomifier Lead Layout, or the relevant contact/lead layout link from where the Zoomifier interface will be used.
- ● Drag and drop the Share Content & Engagement buttons from the available buttons into the Lead Detail section.
- ● Click Save.
3.2.2 Assigning Zoomifier Page Layouts
3.2.3 Enabling Buttons in Lightning Experience
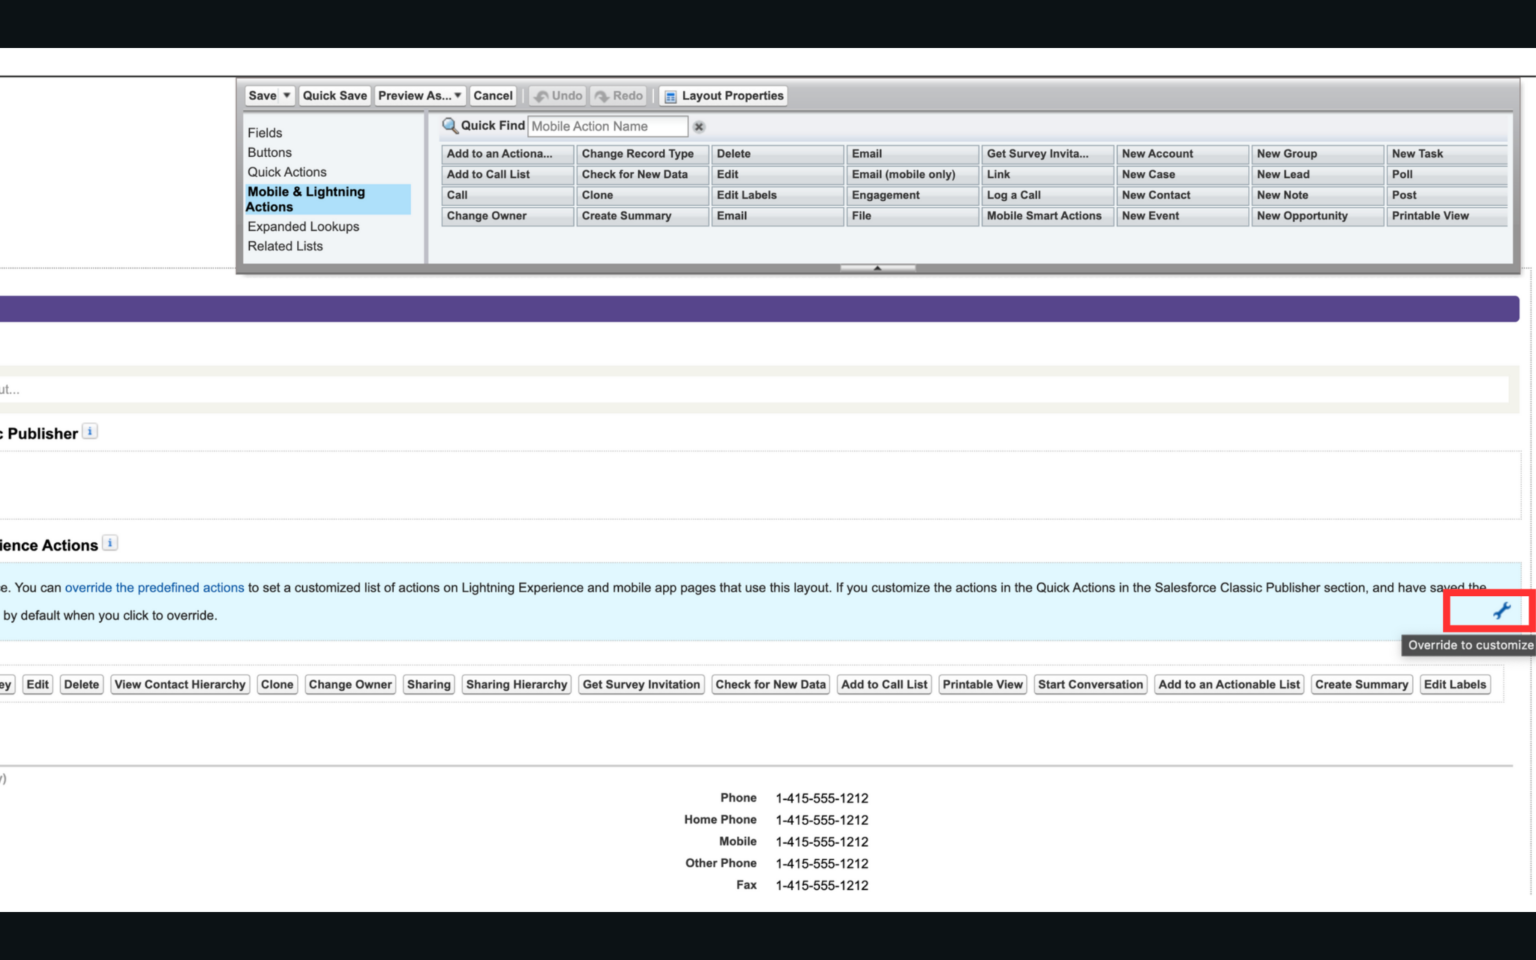
- ● Navigate to Setup > Object Manager > Contacts > Page Layouts.
- ● Click Edit on the relevant layout.
- ● Under Salesforce Mobile and Lightning Experience Actions, click the gear icon.
- ● Drag & drop Share Content and Engagement buttons into the designated section.
- ● Click Save
- ● Repeat for Leads.
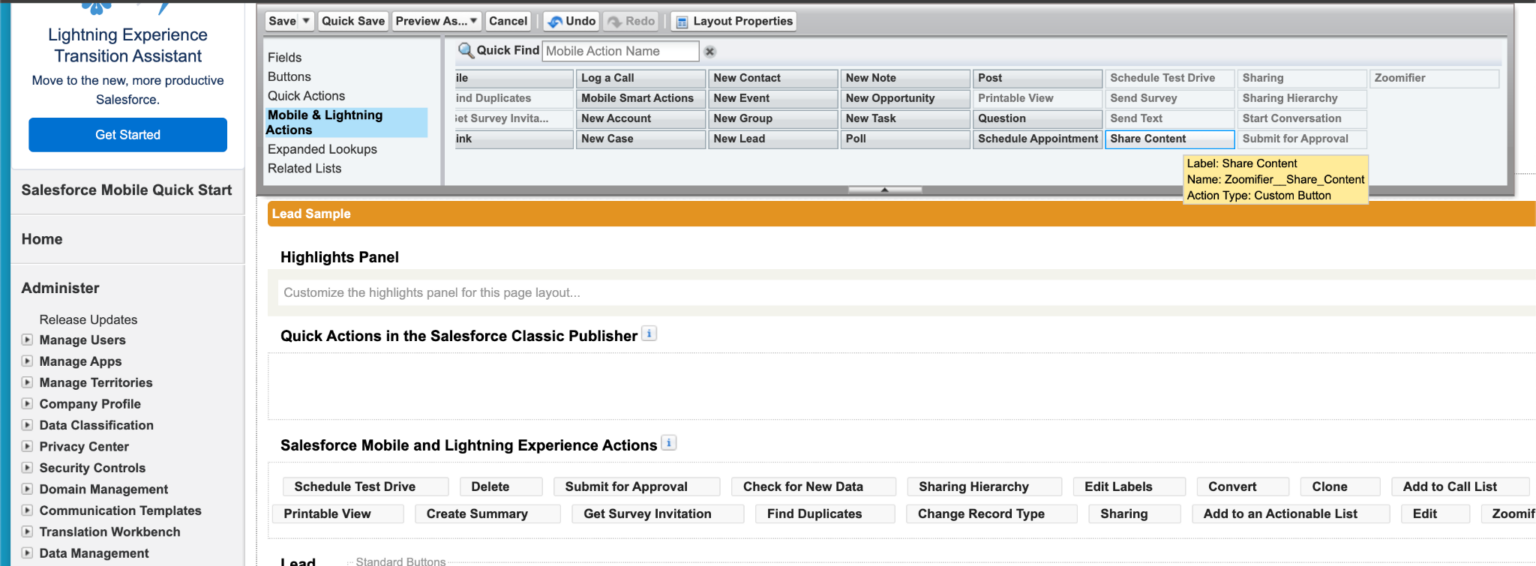
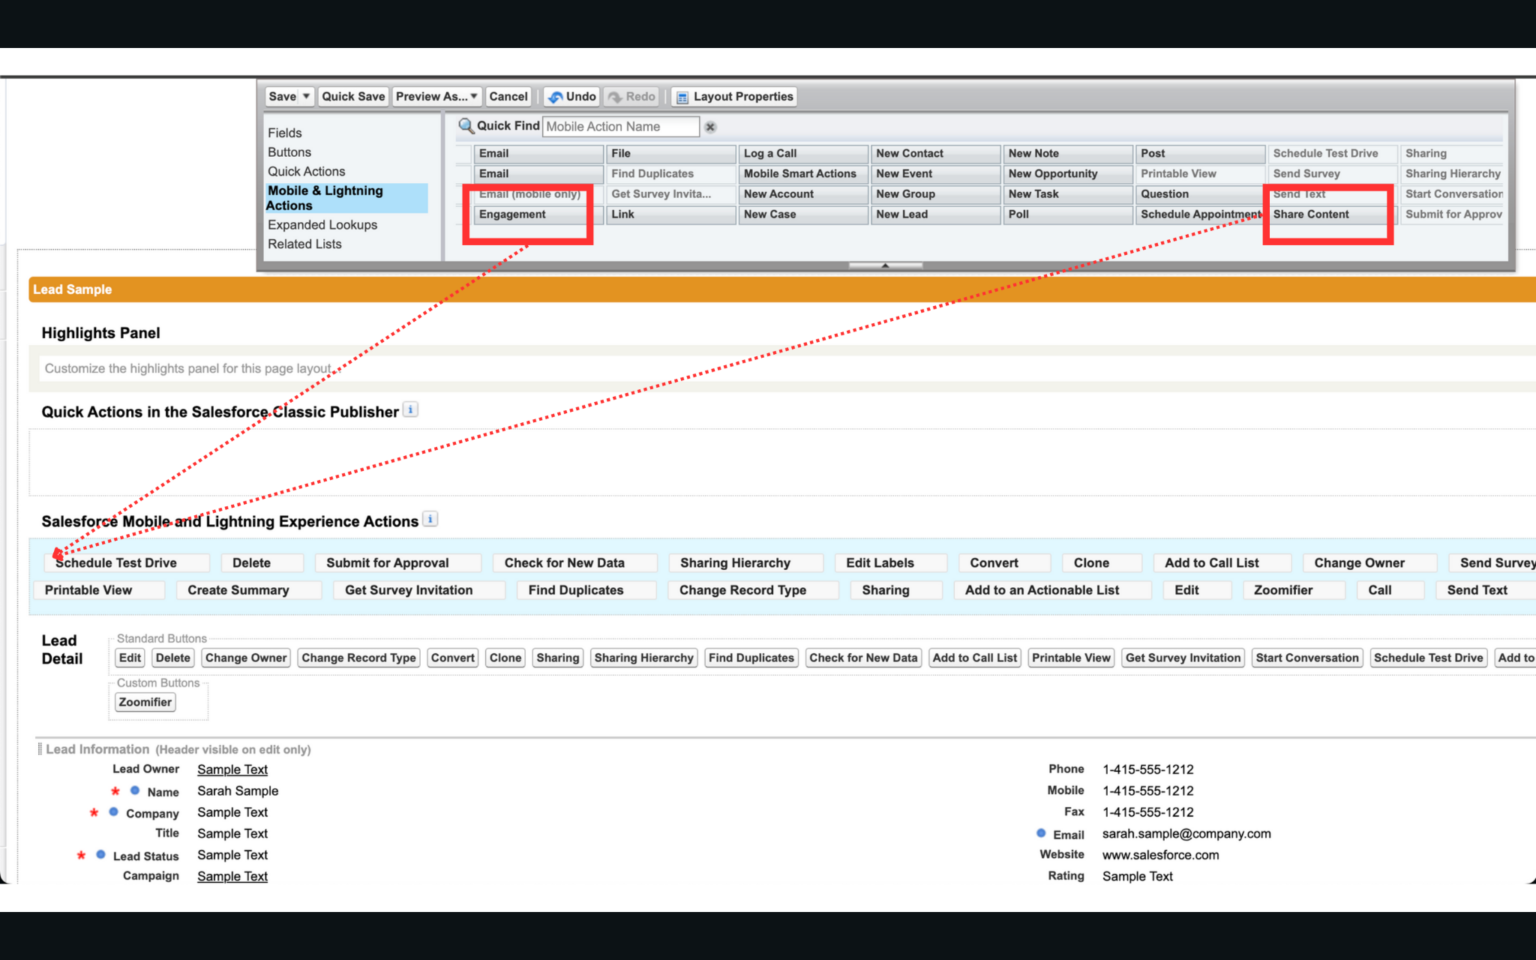
- ● Navigate to Setup > Customize > Leads > Page Layouts (Lightning View: Object Manager > Lead > Page Layouts).
- ● Select Edit on the Zoomifier Lead Layout or the relevant contact/lead layout.
- ● In Salesforce Mobile and Lightning Experience Actions, click the gear icon.
- ● Drag and drop the Share Content & Engagement buttons into the Salesforce Mobile and Lightning Experience Actions.
- ● Click Save.
3.2.4 Adding Zoomifier Events List
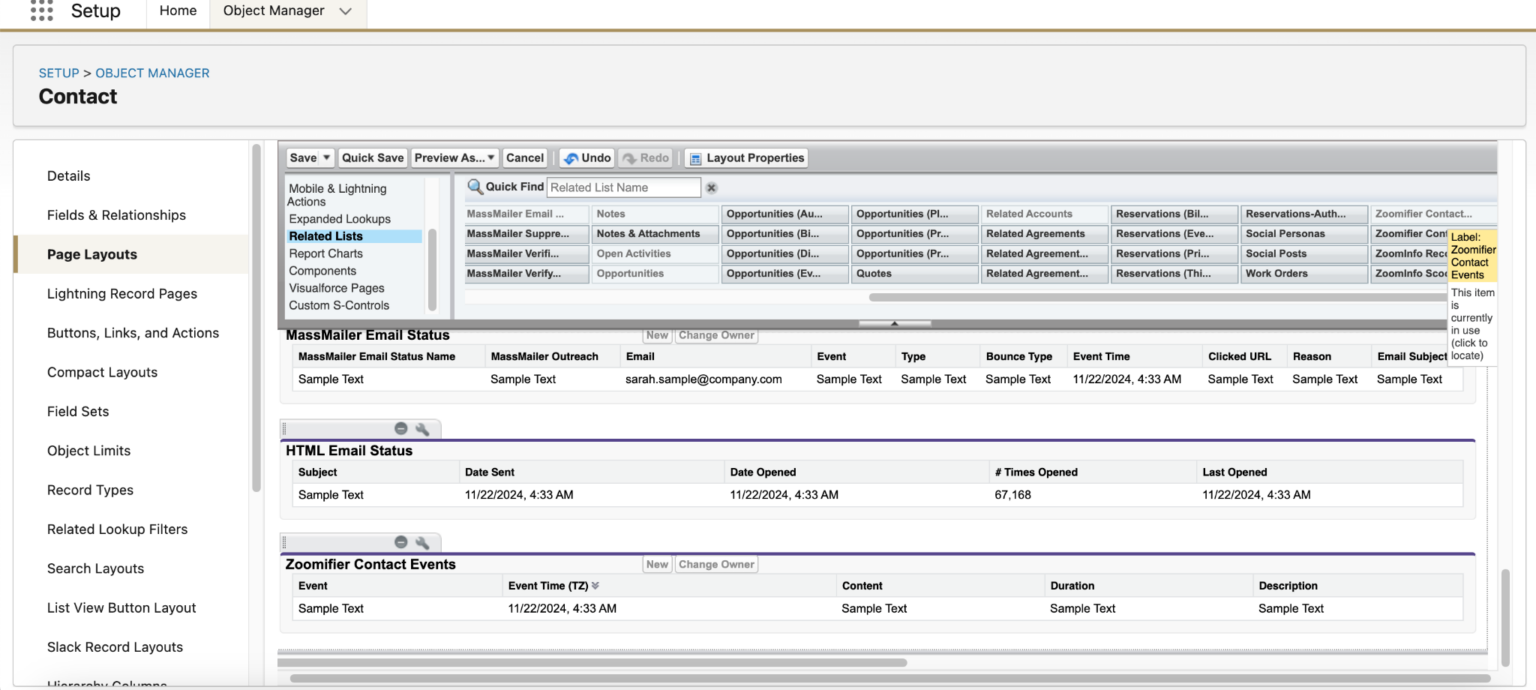
- 1. Navigate to Setup > Object Manager > Contacts > Page Layouts.
- 2. Click Edit on the relevant layout.
- 3. Under Related Lists, locate Zoomifier Contact Events and drag it to the end of the page.
- 4. Click Save.
- 5. Repeat for Leads.
3.2.5 Updating Lightning Record Pages
- Note: Follow this section only if Lightning Record Pages are created for the Contact Page Layout. If the “Zoomifier” button is set up on the Lightning record pages, they need to be updated to show the “Share Content” and “Engagement” buttons. Below are the steps for doing so. For all existing Lightning record pages where the Zoomifier button is currently visible, perform the steps below to display the “Share Content” and “Engagement” buttons. Within the Lightning View:
- 1. Go to Setup > Object Manager > Contact.
- 2. From the left panel, select Lightning Record Pages.
- 3. Find and click on the relevant page.
- 4. Click the Edit button to open the page layout.
- 5. In the page layout, locate and click the block where the buttons should appear.
- 6. On the right side, under Actions, scroll to the bottom and click Add Action.
- 7. Search for and select the custom buttons Share Content and Engagement.
- 8. Adjust the position of these buttons as necessary.
- 9. Click Save to apply the changes.
3.2.6 Adding Users to the Zoomifier User Profile
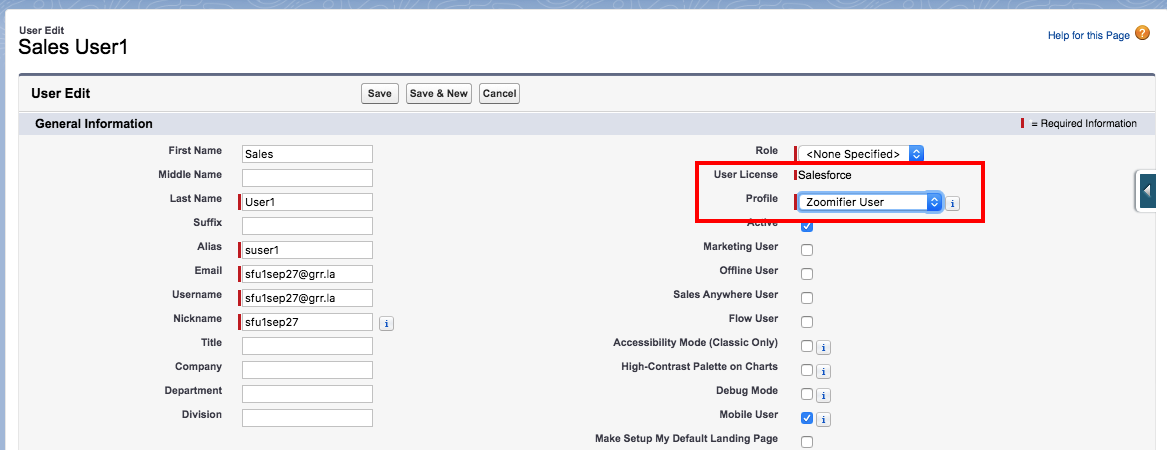
- 1. Create a new user or edit an existing user.
- 2. Select User License as “Salesforce”.
- 3. Set the Profile dropdown to “Zoomifier User”.
- 4. Click Save.
3.2.7 Event Time in Events List
- 1. Navigate to Setup > Customize > Contacts > Customize fields on Contact Page.
- (In the Lightning View: Object Manager > Contacts > Page Layout)
- 2. Click Edit on Zoomifier Contact Layout.
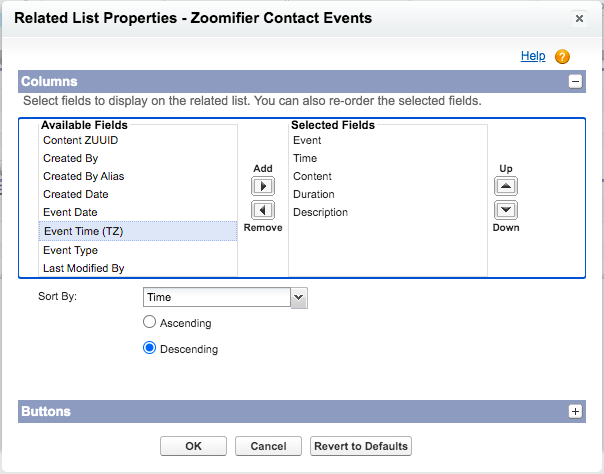
- 3. Scroll down to the Zoomifier Contact Events list and click the gear icon.
- 4. In the dialog box that appears, select the Event Time (TZ) field from the left-hand side and click the Add button.
- 5. Remove the Time field from the selected fields list (by selecting the Time field in the right-hand box and clicking Remove).
- The Event Time (TZ) field displays the time that the event occurred in the logged-in user’s time zone (as set in the Salesforce User Settings for that user).
- 1. Repeat the above steps for the Lead Object as well.
3.3 Optional Configuration
3.3.1 Simulcast Information
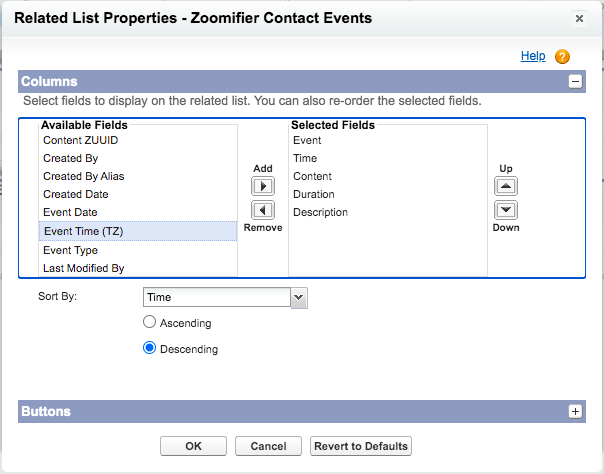
- Simulcast information is updated within the Zoomifier Event object that is used to display the list of Zoomifier events. The description field of the Event object contains information about the Simulcast and its presenter. By default, this is displayed in the Events list.
- Additionally, the Event object contains separate fields for Simulcast Name and Presenter. These can be included in the Events list by configuring the list appropriately.
- Perform the above steps for the Lead Object as well.
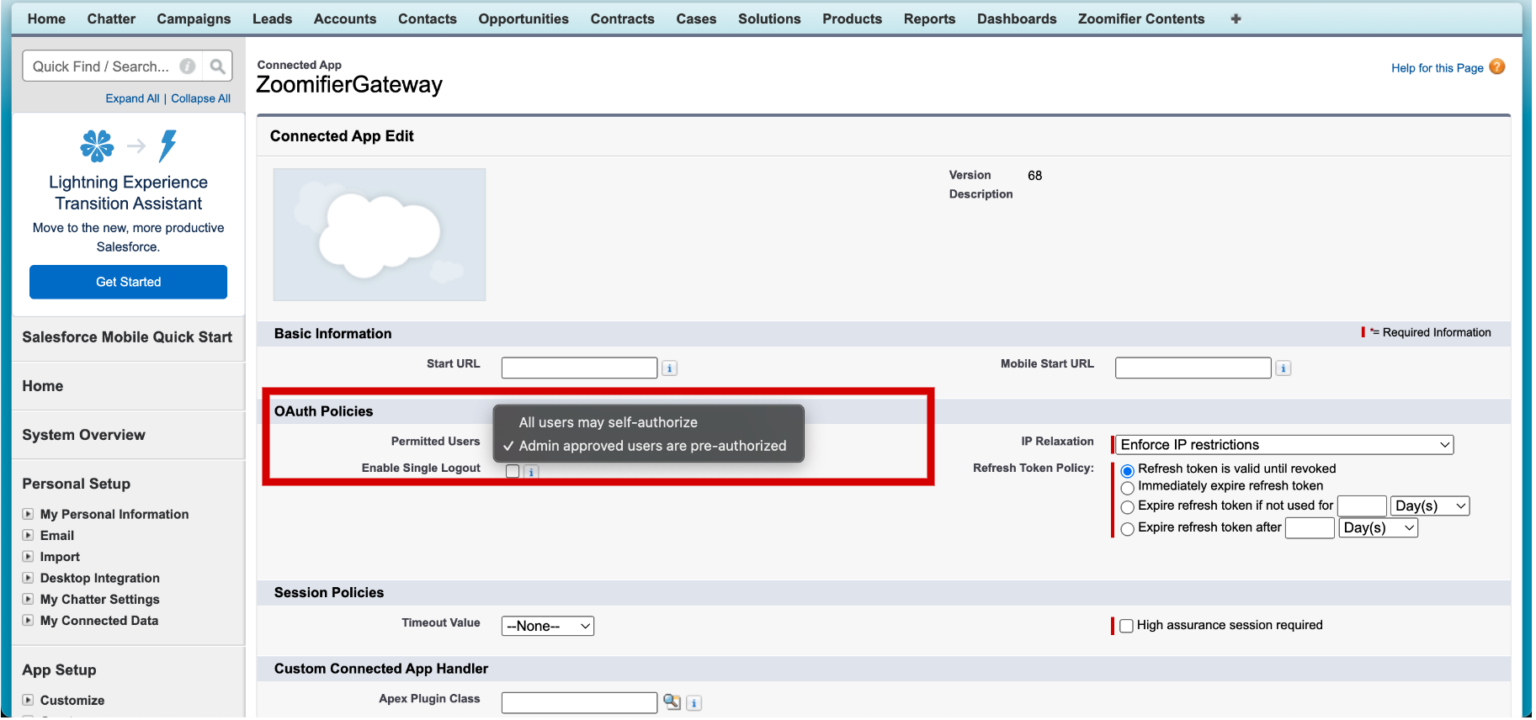
3.3.2 Hiding the Authorization Popup
- To hide the Authorize popup for Zoomifier User and other user profiles, follow the steps below:
- Go to Setup > Manage Apps > Connected Apps
- (In Lightning View: Platform Tools > Apps > Connected Apps > Manage Connected Apps)
- Click Edit for ZoomifierGateway
- Under OAuth Policies, select Permitted Users = Admin-approved users are pre-authorized
- Click Save.
4. Zoomifier Connector Usage
- An SFDC User with Zoomifier Profile logs in to SFDC
- Navigate to a Contact Details view
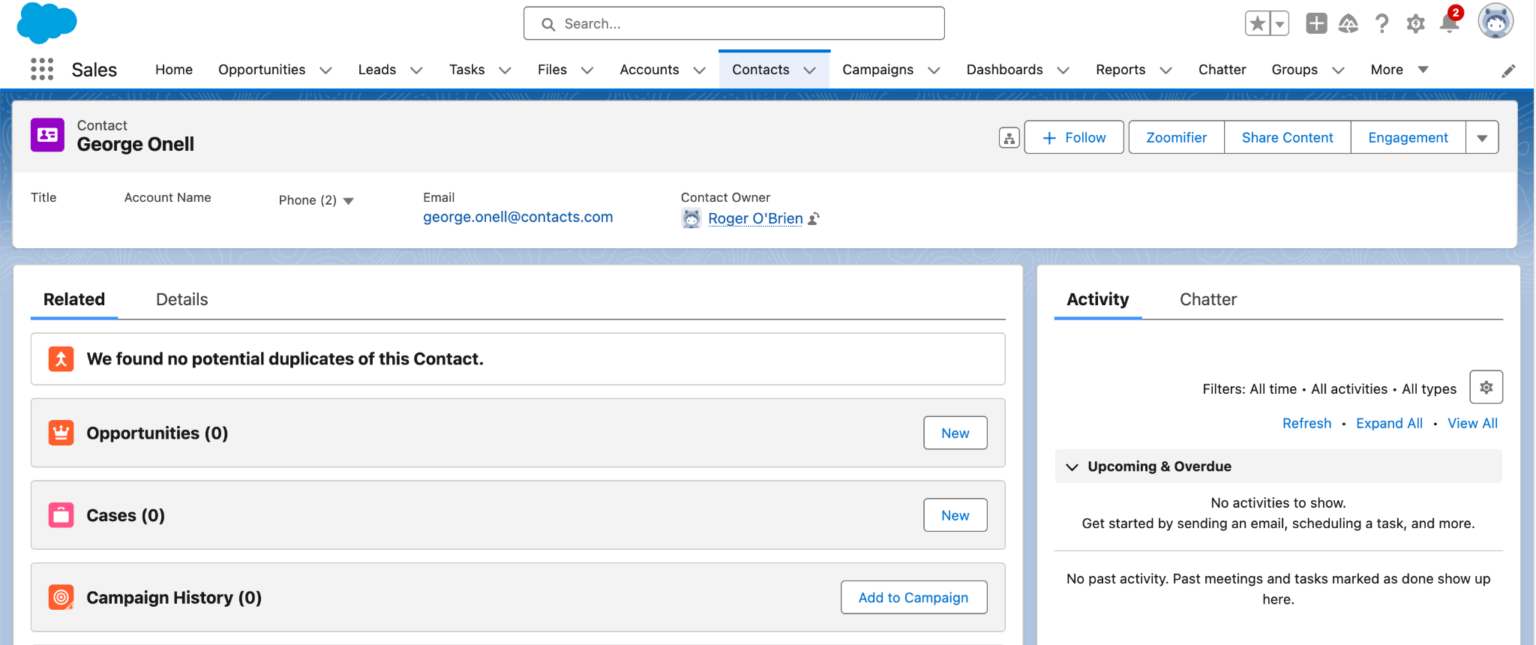
- The “Zoomifier”, “Share Content”, and ”Engagement” buttons are available in the buttons area.
- Now you can proceed to share content from Zoomifier and view the Engagement information in the Zoomifier Events section by clicking on the “Share Content” button from Salesforce.
- You can view the Contact and Leads engagement information within Zoomifier by clicking on the “Engagement” button from Salesforce.
- You can also launch app.zoomifier.com by clicking on the “Zoomifier” button from Salesforce.
- An SFDC User with Zoomifier Profile logs in to SFDC
- Navigate to a Contact Details view
- The “Zoomifier”, “Share Content”, and ”Engagement” buttons are available in the buttons area.
- Now you can proceed to share content from Zoomifier and view the Engagement information in the Zoomifier Events section by clicking on the “Share Content” button from Salesforce.
- You can view the Contact and Leads engagement information within Zoomifier by clicking on the “Engagement” button from Salesforce.
- You can also launch app.zoomifier.com by clicking on the “Zoomifier” button from Salesforce.